DIY - Solar Powered Portable Electric Generator
- Grant Morris

- May 20, 2019
- 4 min read
Updated: May 21, 2019
Are you interested in Solar Power? Then check out this fun DIY at home Solar Power Generator!

The above image is the first phase of the Solar Power Generator. It consists of the following components:

The great thing is that I already had some of the parts such as the storage bin and wire cutter which helped me save some cost. I was also really lucky to find a 100 Watt Solar Panel for less than $60. Solar Panels usually cost around $1 per Watt so anything below $100 for a 100 Watt Solar Panel is a good deal.
The battery is a 100AH (Amp Hour) 12 Volt Deep Cycle Battery. This battery is the big brother to the car battery and is used in camping, marine, and solar systems. This bad boy can power some serious gadgets, but let's discuss some safety points first.
1) This is a DC (Direct Current) System at 12 Volts. This is way safer to compared to working with what's in your house which is AC (Alternating Current) at 120 Volts, but just because it's safer doesn't mean to throw safety out the window. Ever seen a car battery short out? Then yeah, be careful.
2) Any system you build will require a using fuses between the battery and the powered item on the positive (+) line. This will protect your system in case there is a electrical short that could damage your battery or solar panel. I'm using a fuse block that makes it really easy to add and maintain fuses on your system. All you have to do is connect your battery to the positive and negative terminals on the fuse block and you can attach all of your other devices just like they were connected directly to the battery.
3) Watch this 10 Minute YouTube Video to learn more on how electricity works so you can help understand how this solar electrical system works.
Okey Dokey! Now lets take a look at the system as it's laid out in the box.
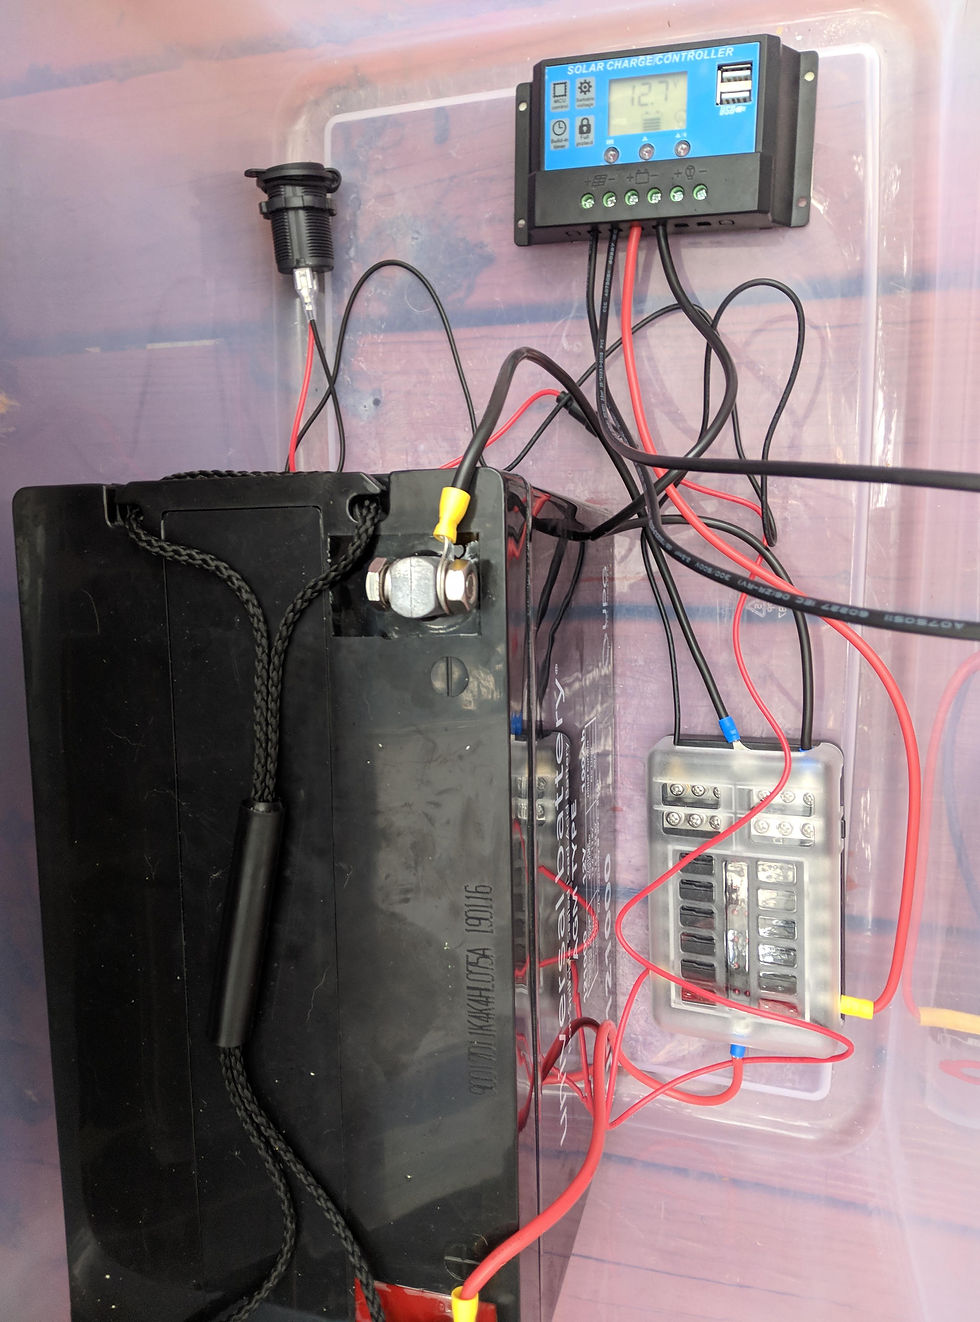
The main part of any solar power system is the battery, so start with connecting that first to the fuse block. I'm using 12 AWG wire and I always make sure that I color code my cords. It is standard to use red cables for positive and black cables for negative. I also used soderless contacts that you can add to your wire to make it really easy to connect. All you have to do is place the striped portion of the wire into the connector and squish the heck out of it with the crimping tool and voila you are ready to connect to your accessory!
To ensure that none of the pieces move around I added mounting tape of the bottom of the battery, fuse block, and solar charger to ensure they don't come loose and cause a short circuit.
The next part to connect is the Solar Charge Controller. This device will regulate the charge of your battery from your solar panel. NOTE: NEVER tie your solar panel directly into your system!!! Doing so can cause your battery to overcharge which could lead to a fire! That's where the solar charge controller comes in handy! It will make sure that your battery never overcharges and will keep you battery in tip top shape. The first step is to connect the positive and negative cables from the fuse block to the charge controller. I'm using a 10A fuse between the connection since my system will only produce at max 7 Amps going into the battery. Once you have the battery plugged in you can attach the positive and negative lines from your solar panel to the charge controller. (It's important that you hook up your battery first and then the solar panel, that way you don't damage your charge controller.)
Once that's all hooked up, point your solar panel to the big fireball in the sky that we call the sun and watch you battery start to charge! If you have a voltage of 12.7 or greater then you battery is at 100%. As you use the battery you will notice that the voltage will start to drop on the solar charge controller display. If you want to make sure your battery lasts as long as possible then you shouldn't let your battery reach below 50% charge which would display as a voltage of 12.20 on your solar charge controller.
Now lets draw some of that power out of the system by adding our first accessory the trusty ol' car cigarette charge socket. Just attach the positive and negative terminals from the back of the socket to the fuse block. My power socket came with a 10A inline fuse, but i went ahead and added another 10A fuse to complete the circuit. Once the connection is complete I plugged in my 150 Watt power inverter which allows you to use small AC plug in devices. For example below, I plugged in the fast charger from my phone which is WAY faster than just plugging into a standard usb. This inverter can also power a small projector or small TV for a few hours.

Speaking of drawing power lets discuss how much power we have available to us. Electrical Power is measured in Watts. The formula to calculate Watts is: Watts = Volts * Amps
So if you have a 12V System that uses 2 Amps then that system is using 24 Watts
The same can be done with the battery:
100 Amp Hours * 12 Volts = 1200 Watt Hours
Remember that you shouldn't draw your lead acid battery less than 50% so lets cut our Watt Hours in half which will give us 600 Watt Hours to use. So if we had a TV that used 55 Watts then we can calculate how long we can run it on our system below.
600 Watt Hours / 55 Watts = 10.9 Hours of use
Keep in mind that no electrical system is 100% efficient, but our system would be able to run a 55 Watt TV for 10 Hours!
I have a few more upgrades that I'm going to do to the system, but I thought this would be a good introduction in how you can set up your own solar powered generator at home or work and help provide power wherever you need it.
Thanks for checking out the blog and let me know if you have any comments or questions below!
-Grant

Comments